Classical Incremental Refresh For Cloud Data Sources in Power BI Service (for Pro accounts)
[TL;DR]
In this post I describe how to implement the classical incremental refresh scenario for the cloud data sources in Power BI Service for Pro accounts. Step by step. It worth to read.
Foreword
As I wrote in the previous post, we can implement a semi-incremental refresh for Pro accounts in Power BI, using just dataflows.
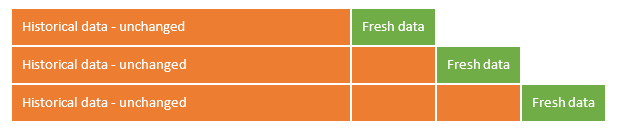
The method I described has a main lack: although the “historical” dataflow remains unchanged and will never load data from the source again, the “refreshing” dataflow will load the whole “fresh” part of data repetitively until you change the date intervals manually.
Initially – there’s small amount of data in the “fresh” part…

…but, after some consequential refreshes, it could become significant, and not so fresh.
You can again split “fresh” it in the two parts – “new historical” and “fresh”, and so on. But this is only SEMI-incremental refresh, and, of course, is not a good solution.
It seemed that implement a complete, classic incremental update using just dataflows is impossible.
But, after some investigations, I found a solution which helps to implement the classical incremental refresh scenario, where the fresh data part remains small and fresh, and historical part become updated without querying a data source.
At least for the cloud data sources.
Warnings
- Power BI dataflows is still in beta, so their behavior could be changed in any time.
- The solution below works only for data sources which do not require on-premises gateway. I still working on the solution for gateways, but for now it seems impossible (or I just cannot find it). Anyway, you can use the semi-incremental approach for such data sources.
Concept (again)
The solution itself looks a little bit tricky, but it is very simple and do not require the deep knowledge of M language or other mysterious concepts.
It is based on the concept of “self-referencing tables” or
“self-referencing queries” in Excel Power Query, described in the various blog posts (the best are by Matt Allington and Imke Feldmann).
It could be described in the few words as following:
- Create a query to the source and load the output to the worksheet table (once).
- Create a second query which will get the new data.
- Change the 1st query so it now referenced to its results (a table, loaded on the worksheet).
- Append 2nd query in the 1st query.
So, after you refresh 1st query, it will read previously stored results, append the new data to it and again store it in the same table on the worksheet.
It works fine but limited to the size of Excel table.
Until recent time this was the only “incremental refresh” we can get (not in Power BI) because Power Query had only one ETL destination (“smart table”), which could be reached by Power Query itself.
Now, with the help of dataflows, we’ve got a new destination of Power Query: Azure Data Lake Storage Gen2. Even it being managed by Power BI, we can reach it and read data from it. We only need to find a solution how to rewrite already stored data without querying a data source again.
Solution
I will show you how it works on the sample project which queries Yandex.Metrika API (popular web-analytics platform in ex-USSR).
Before we start the project, we need to decide, what kind of incremental refresh we would like to do:
- We will just add new data to the existing data set, or
- We will add new data with updating a part of existing data set
For this example I decided to select 2nd option – we will pull stats for the last 7 days (because data could be corrected by the service), so after each daily refresh we need to replace last 6 days of existing data and add a new one.
Below I described the whole process in the steps and screenshots
1. Create a dataflow
Go to the workspace where you want to create a dataflow and… just create it.
2. Get historical data
First of all, we need to get a historical data (as much as we need, for example, up to yesterday) and store it in the ADLS.
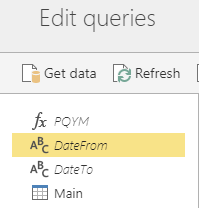
So, we need to create an entity which will query the API. In my case I created 4 entities:
- “PQYM” function which performs an API call and pulls the data
- “DateFrom” text parameter (to be used as the PQYM argument) – in this example just =”2016-01-01”
- “DateTo” text parameter (to be used as the PQYM argument) – in this example = “yesterday”
- “Main” query which invokes PQYM function with DateFrom and DateTo arguments. This query calls an API and then just renames columns and sets data types for columns (setting data types is necessary for the dataflows).
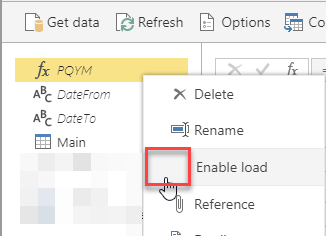
“Enable load” option for the function and parameters must be set off:
Ok, now we must save this dataflow AND refresh it. You may have to wait for a half a minute before dataset will be refreshed.
3. Connect to the saved data
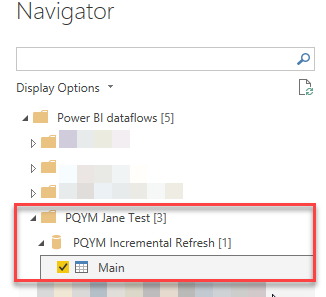
Go to the Power BI Desktop and connect to the “Power BI dataflows (beta)”.

Expand the workspace, then find the dataflow you just created and expand it too. There you can see the one table (in my case named “Main”), which contains already stored historical data.
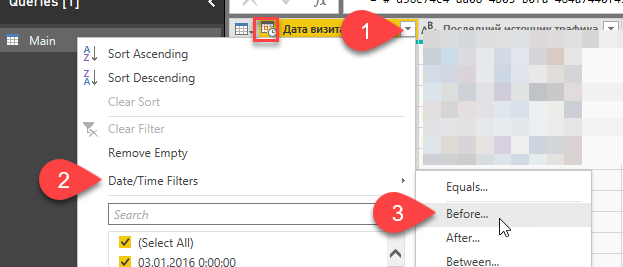
Click “Edit” and open the Query Editor. You can see a table with the query results. Go to the column we want to use as a date filter for incremental refresh, then apply a filter on it “Before…”. Just select some nearest date, we will change it soon.
That’s all with this query. Just right-click on the query name (on the left-side panel) and copy the query. You can close this file – we don’t need it more.

We’ve got a code, which is generated by Power BI Desktop to connect to the saved dataflow.
Now, go back to the Power BI Service, go to the workspace, select the dataflow we created and click “Add entities” button.
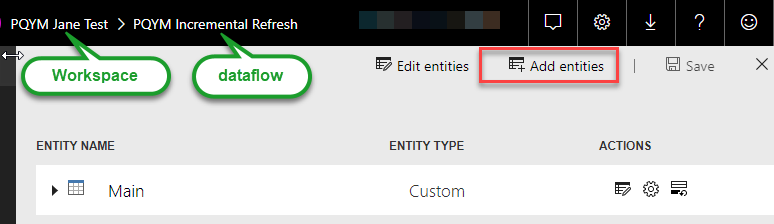
Create “Blank Query” and replace code in the Advanced Editor window with the copied one.
Save this entity as “Staging” (or give it any other name which will tell you that there’s historical data lies). You can see a lot of warnings – ignore them, and, again, disable load for this entity. Warnings should go away.
This query will be used to get the SAVED data from the ADLS storage.
Then we need to provide credentials for this query – it is your Power BI account credentials.
So, we’ve got 2 entities (queries) in our dataflow, one of which is for obtaining data and storying it in the ADLS, other is for read this saved data (but not load it elsewhere).
4. Change the data range
What to do with the new data range? Now starts the tricky part, so be careful.
The API which I use in this project allows to set dates as text strings in “YYYY-MM-DD” format and allows to use keywords as “today” and “yesterday”.
So I just change the “DateTo” parameter to the “yesterday”, but for the “DateFrom” parameter I need to write some piece of code:
= Date.ToText(Date.From(DateTime.FixedLocalNow()-#duration(7,0,0,0)), “yyyy-MM-dd”)

This query read the date and time when it is evaluated, then calculates a date 7 days before and converts it to the desired string format.
5. Change the historical dataset last date
Go to the “Staging” query, and in the formula bar change the filter: instead of #datetime(…) or #date(…) that we see there write “DateTime.From(DateFrom)”. So now we’ve set the query, which read the data from the ADLS, to exclude all the days before the new fresh data to be retrieved.

6. Create query to get fresh data
Then we need to create a query to get fresh data for the last 7 days.
As the query used to retrieve fresh data is the same and differs from the “Main” only by dates range, we can just duplicate the “Main” query. Let do so – right click on the main query, select “Duplicate” and set this new query to “not load” state too. Then we can rename it to “Refreshing”.
As we didn’t change any code in this query, it will read the DateFrom and DateTo parameters, which we already set to the “last 7 days” range.
7. Edit Main query
And there’s the last step.
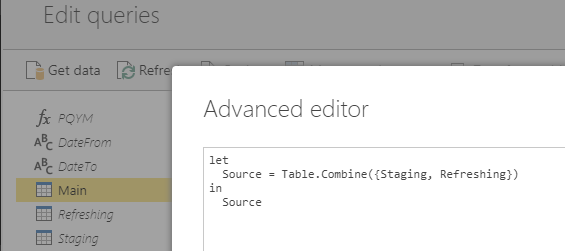
All we need is to go to the “Main” query. Open the Advanced Editor and replace all code in its window with the following:
|
1 2 3 4 |
let Source = Table.Combine({Staging, Refreshing}) in Source |
8. Finish it
Save the dataflow and set a scheduled refresh with the pace you need – daily, or other.
That’s all. Now you can connect to this dataflow from the Desktop and do what you need.
Conclusion
So, what we have got? We have only one dataflow. In this dataflow we have:
- a few parameters,
- one function to get data,
- one query which read saved data,
- one query to get fresh data, and
- one query which combines saved and fresh data and loads it to the ADLS (only this query is enabled to load).
The main trick is in the 2nd – when we performed a first call to the API and saved its result. We’ve got a historical data set, then on the 7th step we changed this query a little bit. This query will never read the historical part of data from the source again – it will consume its own previous result and combine it with the fresh data.
Easy-peasy 😉
To be honest, reading this post take much more time then this process. At least writing it took much, much more time.
Hope it will help you to avoid unnecessary calls to API or OData sources. Or any other source which could be reached without using on-premises gateway.
For these sources which is could be reached only via gateways, I think that there should be a solution – I just didn’t find it yet.
Follow me:Share this: